Appearance
Vue3
1. 为什么学习 Vue3
目标: 了解学习 Vue3 的必要性。
Vue3 运行性能大幅提升,速度是 Vue2 的 1.5 倍左右
Vue3 更好的支持 tree shaking,可以进行按需编译,编译后的文件体积比 Vue2 更小
Vue3 组合式 API 使应用中的功能代码更聚合,使组件间公共逻辑的抽取更容易
Vue3 中提供了更加先进的功能,比如 teleport,suspense 等
Vue3 对 TypeScript 的支持更加友好,对大型前端应用的支持更加游刃有余
Vue 是目前国内前端使用者最多的框架,Vue 官方已经将 Vue3 作为默认版本使用
 .
.
2. 创建 Vue 项目
bash
npm init vite vue-demo3. 安装编辑器插件
目标:安装 VSCode 编辑器插件
- Volar: Vue3 语法支持
- TypeScript Vue Plugin (Volar)
- Prettier-Code formatter: 代码格式化
- ESLint: 代码质量检查
4. 组合式 API 的优势
目标:掌握组合式 API 相比较选项式 API,它的优势是什么。
在选项式API中,它将数据和逻辑进行了分离,所有不相关的数据被放置在了一起,所以不相关的逻辑被放置在了一起,随着应用规模的增加,项目将会变得越来越难以维护。
javascript
export default {
  data: {
    // A...
    // B...
  	// C...
  },
  methods: {
    // A...
    // B...
  	// C...
  },
  computed: {
    // A...
    // B...
  	// C...
  },
  watch: {
    // A...
    // B...
  	// C...
  },
  directives: {
    // A...
    // B...
  	// C...
  }
}
.
.
在组合式 API 中,它将同一个功能的逻辑和数据放置在了一起,使同一个的功能代码更加聚合。
javascript
export default {
  setup () {
    // 属性
    // 方法
    // 计算属性
    // 数据监听
    // ......
  }
}
javascript
export default {
  setup () {
    // A...
    // B...
    // C...
  }
}
.
.
同一个功能的代码可以被抽取到单独的文件中,使应用代码更加维护。
javascript
export default {
  setup () {
    useFunc_1();
    useFunc_2();
  }
}

function useFunc_1() {}
function useFunc_2() {}
.
.
5. 组合式 API 入口
目标:掌握 setup 函数的基本使用
- [ ] 讲解 setup 函数的执行时机以及 this 指向
- [ ] 讲解 setup 函数的返回值的作用及注意事项
setup 函数是一个新的组件选项,它被作为组合式 API 的入口。
javascript
export default {
  setup () {}
}
setup 函数在任何生命周期函数之前执行,且函数内部 this 为 undefined,它不绑定组件实例对象
javascript
export default {
  setup() {
    console.log(this) // 1. undefined
  },
  beforeCreate() {
    console.log("before create") // 2. before create
  },
}
setup 函数的返回值必须是对象,对象中的属性会被添加到组件实例对象中,所以它们可以在其他选项和模板中使用
javascript
export default {
  setup() {
    let name = "张三"
    let age = 20
    return { name, age }
  },
  beforeCreate() {
    console.log(this.name);
  },
}
html
<template>{{ name }} | {{ age }}</template>注意:在 setup 方法中声明的变量虽然可以在模板中显示,但它不是响应式数据,就是说当数据发生变化后视图不会更新。
javascript
export default {
  setup() {
    let name = "张三"
    let age = 20
    const onClickHandler = () => {
      name = "李四"
      age = 30
    }
    return { name, age, onClickHandler }
  }
}
html
<template>
  {{ name }} | {{ age }}
	<button @click="onClickHandler">button</button>
</template>
6. 创建响应式数据 ref
目标:掌握使用 ref 方法创建、修改响应式数据的方式。
- [ ] 讲解 ref 方法的作用是什么
- [ ] 讲解如何使用 ref 方法创建、修改基本数据类型的响应式数据
- [ ] 讲解如何使用 ref 方法创建、修改引用数据类型的响应式数据
ref 方法用于创建响应式数据,即数据的变化可以引起视图的更新。
使用 ref 方法创建基本数据类型的响应式数据。
javascript
import { ref } from "vue"
export default {
  setup() {
    const name = ref("张三")
    const age = ref(20)
    return { name, age }
  },
}
使用 ref 创建的数据在模板中可以直接使用。
html
<template>{{ name }} | {{ age }}</template>在 JavaScript 中通过 value 属性修改数据。
javascript
export default {
  setup() {
    const name = ref("张三")
    const age = ref(20)
    const onClickHandler = () => {
      name.value = "李四"
      age.value = 30
    }
    return { name, age, onClickHandler }
  },
}
html
<template>
  {{ name }} | {{ age }}
	<button @click="onClickHandler">button</button>
</template>
使用 ref 方法创建引用数据类型的响应式数据。
javascript
export default {
  setup() {
    const person = ref({ name: "张三", age: 30 })
    const onClickHandler = () => {
      person.value.name = "王五"
      person.value.age = 50
      // 重新为 person 赋值也是可以的
      // person.value = {name: '李四', age: 40}
    }
    return { person, onClickHandler }
  },
}
html
<template>
  {{ person.name }} | {{ person.age }}
  <button @click="onClickHandler">button</button>
</template>
7. 创建响应式数据 reactive
目标: 掌握使用 reactive 方法创建响应式数据的方式,掌握 reactive 方法和 ref 方法的区别。
- [ ] 讲解 reactive 方法的作用
- [ ] 讲解如何使用 reactive 方法创建基于引用数据类型的响应式数据
- [ ] 对比 ref 方法和 reactive 方法在使用上的不同
reactive 方法用来创建响应式数据,创建基于引用数据类型的响应式数据。
使用 reactive 方法创建基于引用数据类型的响应式数据。
javascript
import { reactive } from "vue"
export default {
  setup() {
    const person = reactive({ name: "张三", age: 20 })
    const onClickHandler = () => {
      person.name = "李四"
      person.age = 50
    }
    return { person, onClickHandler }
  },
}
html
<template>
  {{ person.name }} | {{ person.age }}
  <button @click="onClickHandler">button</button>
</template>
reactive 方法只能创建基于引用数据类型的响应式数据,对于基本数据类型它是不起作用的。
javascript
export default {
  setup() {
    let name = reactive("张三")
    const onClickHandler = () => {
      // name = "李四"
      // name.value = "李四"
      name = reactive("李四")
    }
    return { name, onClickHandler }
  },
}
需求: 在点击按钮后将 newPerson 中的值赋值给 person
javascript
export default {
  name: 'App',
  setup () {
    let person = reactive({name: '张三', age: 30})
    const newPerson = {name: '李四', age: 50}
    const onClickHandler = () => {
      for (const attr in newPerson) {
        person[attr] = newPerson[attr]
      }
    }
    return {person, onClickHandler}
  }
}
ref 既可以创建基于基本数据类型的响应式数据也可以创建基于引用数据类型的响应式数据,reactive 只用于创建基于引用数据类型的响应式数据。
ref 在 JS 中使用时需要点上 value, 而 reactive 在 JS 中使用时不需要点上 value,在模板中使用时都不需要加 value。
ref 创建的响应式数据可以被直接整体赋值,而 reactive 创建的响应式数据不可以,若要整体赋值需要使用遍历的方式。
8. 计算属性 computed
目标:掌握使用 computed 方法创建计算属性的方式
- [ ] 说明 computed 方法的作用及使用方式
- [ ] 通过名字搜索案例学习 computed 方法的使用
计算属性是指基于现有状态派生(演变)出新的状态,现有状态发生变化,派生状态重新计算,在 Vue3 中通过 computed 方法创建计算属性。
computed 接收回调函数作为参数,基于回调函数中使用的响应式数据进行计算属性的创建,回调函数的返回值就是基于现有状态演变出的新状态。
vue
<template> {{result}} </template>
<script>
import { computed, ref } from "vue";
export default {
  setup () {
    const num = ref(10);
    const result = computed(() => num.value *2);
    return { result }
  }
}
</script>
案例:在搜索框中输入名字,在现有名字中查找,找到后列出名称列表。
javascript
import { ref, computed } from "vue"
export default {
  setup() {
    const names = ref(["林俊杰","孙燕姿","周杰伦","张惠妹","刘若英","林宥嘉","刘德华","张韶涵","周笔畅","孙楠"])
    const search = ref("")
    const filterNames = computed(() =>
      names.value.filter(name => name.includes(search.value))
    )
    return { search, filterNames }
  },
}
html
<template>
  <input type="text" v-model="search" />
  <ul>
    <li v-for="name in filterNames">{{ name }}</li>
  </ul>
</template>
9. 监听状态 watch
目标:掌握 watch 方法监听响应式数据(组件状态)的方式
- [ ] 说明 watch 方法的作用是什么
- [ ] 如何使用 watch 方法监听基于 ref 创建的响应式数据 (基本数据类型、引用数据类型)
- [ ] 如何使用 watch 方法监听响应式数据内部的具体属性 (基本数据类型、引用数据类型)
- [ ] 如何使用 watch 监听多个值的变化
- [ ] 说明 watch 方法中的 immediate 配置选项的作用
watch 方法用于监听响应式数据的变化。
使用 watch 方法监听基于 ref 创建的响应式数据 (基本数据类型)。
javascript
import { ref, watch } from "vue"
export default {
  setup() {
    const text = ref("")
    watch(text, (current, previous) => {
      console.log("current", current)
      console.log("previous", previous)
    })
    return { text }
  },
}
html
<template>
  <input type="text" v-model="text" />
</template>
使用 watch 监听基于 ref 创建的响应式数据 (引用数据类型)。
javascript
import { ref, watch } from "vue";

export default {
  name: "App",
  setup() {
    const person = ref({ name: "张三" });
    watch(person.value, (current) => {
      console.log(current);
    });
  },
};
vue
<template>
  <button @click="onClickHandler">{{ person.name }}</button>
</template>
使用 watch 监听响应式数据内部的具体属性 (基本数据类型)
javascript
import { ref, watch } from "vue";

export default {
  name: "App",
  setup() {
    const person = ref({ name: "张三" });
    watch(
      () => person.value.name,
      (current) => {
        console.log(current);
      }
    );
    return { person };
  },
};
使用 watch 监听响应式数据内部的具体属性 (引用数据类型)
vue
<template>
  <p>{{ person.brand.title }}</p>
  <button @click="changeBrandTitle">title</button>
</template>

<script>
import { ref, watch } from "vue";
export default {
  name: "App",
  setup() {
    const person = ref({ brand: { title: "宝马" }});
    const changeBrandTitle = () => {
      person.value.brand.title = "奔驰";
    };
    watch(person.value.brand, (current) => {
      console.log(current);
    });
    return { person, changeBrandTitle };
  },
};
</script>
使用 watch 监听基于 reactive 创建的响应式数据。
javascript
import { reactive, watch } from "vue"
export default {
  setup() {
    const person = reactive({ name: "张三" })
    const onClickHandler = () => {
      person.name = "李四"
    }
    watch(person, (current, previous) => {
      console.log(current)
    })
    return { person, onClickHandler }
  },
}
html
<template>
  {{ person.name }}
  <button @click="onClickHandler">button</button>
</template>
使用 watch 监听多个值的变化
javascript
import { ref, watch } from "vue"
export default {
  setup() {
    const firstName = ref("")
    const lastName = ref("")
    watch([firstName, lastName], current => {
      console.log(current)
    })
    return { firstName, lastName }
  },
}
html
<template>
  <input type="text" v-model="firstName" />
  <input type="text" v-model="lastName" />
</template>
使 watch 监听数据在初始时执行一次
javascript
import { ref, watch } from "vue"
export default {
  setup() {
    const firstName = ref("hello")
    const lastName = ref("world")
    watch(
      [firstName, lastName],
      current => {
        console.log(current)
      },
      {
        immediate: true,
      }
    )
    return { firstName, lastName }
  },
}
10. 监听状态 watchEffect
目标:掌握使用 watchEffect 监听数据的方式
- [ ] 说明 watchEffect 方法的作用
- [ ] 说明 watchEffect 方法的使用方式
watchEffect 和 watch 一样,都是用于监听响应式数据的变化。
watchEffect 只关心数据的最新值,不关心旧值是什么,而且 watchEffect 默认会在初始时执行一次。
javascript
import { ref, watchEffect } from "vue";

export default {
  name: "App",
  setup() {
    const firstName = ref("");
    const lastName = ref("");
    watchEffect(() => {
      console.log(firstName.value);
      console.log(lastName.value);
    });
    return { firstName, lastName };
  },
};
html
<template>
  <input type="text" v-model="firstName" />
  <input type="text" v-model="lastName" />
</template>
11. toRef 方法
目标:掌握 toRef 方法的使用方式及应用场景
- [ ] 通过一段基础的 JavaScript 代码回顾基本数据类型的在赋值时的值传递特性, 为讲解 toRef 方法做铺垫
- [ ] 通过一段基础的 Vue 代码了解在不使用 toRef 方法时存在的问题
- [ ] 说明 toRef 方法的作用并使用 toRef 方法解决问题
- [ ] 说明 toRef 方法的应用场景
说出以下代码的输出结果是什么?
javascript
let person = { name: "张三" };
// 值传递 -> 将原有值复制了一份
let name = person.name;
person.name = "李四";
console.log(name); // ?
当按钮被点击时模板中的数据会发生更新吗?
vue
<template>
  <p>{{ name }}</p>
  <p>{{ person.name }}</p>
  <button @click="onClickHandler">button</button>
</template>
<script>
import { ref } from "vue";
export default {
  name: "App",
  setup() {
    const person = ref({ name: "张三" });
    const onClickHandler = () => {
      person.value.name = "李四";
    };
    return {
      name: person.value.name,
      person,
      onClickHandler,
    };
  },
};
</script>
toRef 方法用于将响应式数据内部的普通数据转换为响应式数据,并且转换后的数据和原始数据存在引用关系,存在引用关系意味着当原始数据发生变化后,toRef 转换后的数据也会跟着变化。
vue
<template>
  <p>{{ name }}</p>
  <p>{{ person.name }}</p>
  <button @click="onClickHandler">button</button>
</template>

<script>
import { ref, toRef } from "vue";
export default {
  name: "App",
  setup() {
    const person = ref({ name: "张三" });
    const onClickHandler = () => {
      person.value.name = "李四";
    };
    return {
      name: toRef(person.value, "name"),
      person,
      onClickHandler,
    };
  },
};
</script>
需求: 当响应式数据的结构层级比较深时,在模板中使用起来也比较繁琐,能不能在模板中使用时简化结构层级呢?
javascript
export default {
  setup() {
    const person = ref({ brand: { name: "宝马" } });
    return { person }
  },
}
html
<template>{{ person.brand.name }}</template>如果能够将模板中的 person.brand.name 简化成 brandName 的话,模板代码会更加简洁,所以按照想法代码很自然的就写成了下面这样。
vue
<template>
  <p>{{ person }}</p>
  <p>{{ brandName }}</p>
  <button @click="onClickHandler">button</button>
</template>

<script>
import { ref } from "vue";
export default {
  name: "App",
  setup() {
    const person = ref({ brand: { name: "宝马" } });
    const onClickHandler = () => {
      person.value.brand.name = "奔驰";
    };
    return {
      person,
      brandName: person.value.brand.name,
      onClickHandler,
    };
  },
};
</script>
vue
<template>
  <p>{{ person }}</p>
  <p>{{ brandName }}</p>
  <button @click="onClickHandler">button</button>
</template>

<script>
import { ref, toRef } from "vue";
export default {
  name: "App",
  setup() {
    const person = ref({ brand: { name: "宝马" } });
    const onClickHandler = () => {
      person.value.brand.name = "奔驰";
    };
    return {
      person,
      brandName: toRef(person.value.brand, "name"),
      onClickHandler,
    };
  },
};
</script>
12. toRefs 函数
目标:掌握 toRefs 方法批量转换响应式数据的方式。
- [ ] 说明 toRefs 方法的作用是什么以及基本用法
- [ ] 通过例子验证 toRefs 方法的使用方式
通过 toRef 方法一次只能转换一个数据,通过 toRefs 方法可以实现批量数据转换。
toRefs 方法接收引用数据类型的响应式数据,它可以将数据中的第一层属性全部转换为响应式数据, 返回值是一个对象, 对象中存储了所有转换之后的响应式数据。
javascript
import { reactive, toRefs } from "vue";

export default {
  name: "App",
  setup() {
    const person = reactive({
      name: "张三",
      age: 20,
      brand: { title: "宝马", year: 1 },
    });
    return { ...toRefs(person) };
  },
};
vue
<template>{{ name }} {{ age }} {{ brand.title }} {{ brand.year }}</template>对引用数据类型内部的数据进行转换
javascript
import { reactive, toRefs } from "vue";

export default {
  name: "App",
  setup() {
    const person = reactive({
      name: "张三",
      age: 20,
      brand: { title: "宝马", year: 1 },
    });
    return { ...toRefs(person), ...toRefs(person.brand) };
  },
};
vue
<template>{{ name }} {{ age }} {{ title }} {{ year }}</template>13. 组件通讯
目标:掌握组合式 API 中父子组件通信的方式
- [ ] 讲解父组件如何向子组件传递数据
- [ ] 讲解子组件如何更改父组件传递过来的数据
父组件通过 props 向子组件传递数据
html
<template>
  <div>I am parent component</div>
	<hr />
  <ChildComp :msg="msg"></ChildComp>
</template>

<script>
import ChildComp from "./components/ChildComp.vue"
import { ref } from "vue"
export default {
  name: "App",
  components: { ChildComp },
  setup() {
    const msg = ref("a message from parent")
    return { msg }
  },
}
</script>
vue
<template>
  <div>
    {{ childMsg }}
    <hr />
    {{ msg }}
  </div>
</template>
<script>
import { computed } from "vue";
export default {
  name: "ChildComponent",
  props: ["msg"],
  setup(props) {
    // 当父组件更新 props 时 setup 函数是不会重新执行的
    // 所以在 setup 函数中使用 props 时需要用到 computed 或者 watch 来响应 props 的变化
    // 注意: 直接在模板中使用 props 数据是没有这个问题的
    const childMsg = computed(() => props.msg + "😀😀");
    return { childMsg };
  },
};
</script>
子组件通过自定义事件向父组件传递数据
vue
<template>
	<div>
    {{ childMsg }}
    <hr />
    {{ msg }}
    <hr />
    <button @click="onMsgChanged">change msg</button>
  </div>
</template>
<script>
import { computed } from "vue";

export default {
  name: "ChildComponent",
  props: ["msg"],
  setup(props, { emit }) {
    const onMsgChanged = () => {
      emit("onMsgChanged", "changed msg from children");
    };
    return { onMsgChanged };
  },
};
</script>
html
<template>
  <ChildComponent :msg="msg" @onMsgChanged="onMsgChanged" />
</template>

<script>
import { ref } from "vue";
import ChildComponent from "./components/child-component.vue";
export default {
  components: { ChildComponent },
  name: "App",
  setup() {
    const msg = ref("i am a message");
    const onMsgChanged = (data) => {
      msg.value = data;
    };
    return { msg, onMsgChanged };
  },
};
</script>
注意事项:在 Vue2 中,模板需要被一个根元素包裹,但是在 Vue3 中是不需要的,Vue3 支持在模板中编写代码片段。
vue
<template>
  <div>{{ childMsg }}</div>
  <button @click="onClickHandler">change msg</button>
</template>
如果在模板中使用代码片段, 自定义事件需要被显式的声明在 emits 选项中.
javascript
emits: ["onMsgChanged"],14. 组件生命周期
目标:掌握组件生命周期函数的使用方式 VUE3 生命周期函数
- [ ] 说明 setup 函数的执行时机
- [ ] 说明 onMounted、onUpdated、onUnmounted 组件生命周期函数的执行时机
setup: 组件初次挂载前、重新挂载前都会执行。
vue
<!-- App组件 父组件  -->
<template>
  <button @click="show = !show">toggle</button>
  <ChildComponent v-if="show"></ChildComponent>
</template>

<script>
import { ref } from "vue";
import ChildComponent from "./components/child-component.vue";
export default {
  components: { ChildComponent },
  name: "App",
  setup() {
    const show = ref(true);
    return { show };
  },
};
</script>
vue
<!-- ChildComponent 组件 子组件 -->
<template>child component</template>
<script>
export default {
  name: "ChildComponent",
  setup() {
    // setup 函数会在组件每次重新渲染时执行
    console.log("setup");
  },
};
</script>
onMounted 组件挂载完成后执行
onUpdated 组件数据更新后执行
onUnmounted 组件卸载后执行
vue
<!-- child-component  -->
<template>{{ count }} <button @click="onClickHandler">button</button></template>
<script>
import { onMounted, onUnmounted, onUpdated, ref } from "vue";

export default {
  name: "ChildComponent",
  setup() {
    let timer = null;
    // 组件挂载完成之后开启定时器
    onMounted(() => {
      timer = setInterval(() => {
        console.log("timer...");
      }, 1000);
    });
    // 组件卸载完成之后清除定时器
    onUnmounted(() => {
      clearInterval(timer);
    });
    const count = ref(0);
    const onClickHandler = () => {
      count.value = count.value + 1;
    };
    // 组件更新之后在控制台中输出 onUpdated
    onUpdated(() => {
      console.log("onUpdated");
    });
    return { count, onClickHandler };
  },
};
</script>
15. 与服务端通信
目标:掌握在组合式 API 中实现与服务器端通讯的方式
- [ ] 通过例子说明如何在组合式 API 中实现与服务器端通讯
- [ ] 讲解抽取可重用逻辑的方式, 充分发挥组合式API的优势
向服务器端发送请求获取列表数据渲染列表数据, 没有数据要显示暂无数据, 如果请求报错展示错误信息, 加载过程显示loading.
vue
<script>
import { ref } from "vue";
import axios from "axios";

export default {
  name: "App",
  setup() {
    // 用于存储列表数据
    const data = ref(null);
    // 用于标识加载状态
    const loading = ref(false);
    // 用于存储错误信息
    const error = ref(null);
    // 用于发送请求的方法
    async function getPosts() {
      // 更新加载状态
      loading.value = true;
      try {
        // 发送请求
        let response = await axios.get(
          "https://jsonplaceholder.typicode.com/posts"
        );
        // 存储列表数据
        data.value = response.data;
      } catch (err) {
        // 存储错误信息
        error.value = err.message;
      }
      // 更新加载状态
      loading.value = false;
    }
    // 调用方法 发送请求
    getPosts();
    // 返回模板所需数据
    return { data, loading, error };
  },
};
</script>
html
<template>
  <div v-if="loading">loading...</div>
  <div v-else-if="error">{{ error }}</div>
  <div v-else-if="data && data.length > 0">
    <ul>
      <li v-for="item in data">{{ item.title }}</li>
    </ul>
  </div>
  <div v-else>暂无数据</div>
</template>
注意: 如果在导入 axios 时报错,重新启动应用程序即可。
将获取 Posts 数据的逻辑抽取单独文件中,使其可以在多个组件中被重复使用。
javascript
export default {
  name: "App",
  setup() {
    const { data, loading, error, getPosts } = usePosts();
    getPosts();
    return { data, loading, error };
  },
};
javascript
import { ref } from "vue";
import axios from "axios";

function usePosts() {
  const data = ref(null);
  const loading = ref(false);
  const error = ref(null);
  async function getPosts() {
    loading.value = true;
    try {
      let response = await axios.get(
        "https://jsonplaceholder.typicode.com/posts"
      );
      data.value = response.data;
    } catch (err) {
      error.value = err.message;
    }
    loading.value = false;
  }
  return { data, loading, error, getPosts };
}
16. 获取 DOM 对象
目标:掌握在组合式 API 中获取 DOM 对象的方式
- [ ] 说明如何使用 ref 获取单个 DOM 对象
- [ ] 说明如何使用 ref 获取一组 DOM 对象
获取单个 DOM 对象
javascript
import { ref, onMounted } from "vue"
export default {
  setup() {
    const divRef = ref(null)
    onMounted(() => {
      console.log(divRef.value)
    })
    return { divRef }
  },
}
html
<template>
  <div ref="divRef">Hello Ref</div>
</template>
获取一组 DOM 对象
javascript
import { ref, onMounted, onUpdated } from "vue"
export default {
  setup() {
    const list = ref(["a", "b", "c"])
    const elms = ref([])
    const onClickHandler = () => list.value.push("d")
    onMounted(() => console.log(elms.value))
    onUpdated(() => console.log(elms.value))
    return { list, elms, onClickHandler }
  },
}
html
<template>
  <ul>
    <li v-for="(item, index) in list" :key="index" :ref="(el) => (elms[index] = el)">
      {{ item }}
    </li>
  </ul>
  <button @click="onClickHandler">button</button>
</template>
17. provide、inject 函数
目标:掌握跨组件层级传递数据的方式
通过 provide、inject 函数的配合使用,可以实现跨组件传递数据(组件与组件存在嵌套关系)
vue
<!-- 父组件 App -->
<template>
  <ChildComponent />
</template>

<script>
import { ref, provide } from "vue";
import ChildComponent from "./components/ChildComponent.vue";

export default {
  components: { ChildComponent },
  name: "App",
  setup() {
    const person = ref({ name: "张三" });
    const changePerson = () => {
      person.value.name = "李四";
    };
    provide("person", person);
    provide("changePerson", changePerson);
  },
};
</script>
html
<!-- 子组件 -->
<template>
  <LastComponent />
</template>
<script>
import LastComponent from "./LastComponent.vue";
export default {
  components: { LastComponent },
  name: "ChildComponent",
};
</script>
html
<!-- 孙组件 -->
<template>
  {{ person.name }}
  <button @click="changePerson">button</button>
</template>
<script>
import { inject } from "vue";
export default {
  name: "LastComponent",
  setup() {
    const person = inject("person");
    const changePerson = inject("changePerson");
    return { person, changePerson };
  },
};
</script>
18. teleport 组件
目标:掌握 teleport 组件的使用方式
- [ ] 说明 teleport 组件的作用
- [ ] 通过案例验证 teleport 组件的用法
teleport 组件可以将指定组件渲染到应用外部的其他位置。
比如弹框组件,它可能在任意组件中使用,但它不属于任意组件,所以不能在使用它的组件中渲染它,我们需要将它渲染到指定位置。
vue
<!-- Modal.vue -->
<template>
  <div class="wrapper">
    <div class="content">
      <a class="close" href="javascript:">关闭</a>
    </div>
  </div>
</template>
<script>
export default {
  name: "Modal",
};
</script>
<style scoped>
.wrapper {
  position: absolute;
  left: 0;
  top: 0;
  right: 0;
  bottom: 0;
  z-index: 999;
  background: rgba(0, 0, 0, 0.4);
}
.content {
  width: 660px;
  height: 400px;
  background: white;
  position: absolute;
  left: 50%;
  top: 50%;
  transform: translate(-50%, -50%);
}
.close {
  position: absolute;
  right: 10px;
  top: 10px;
  color: #999;
  text-decoration: none;
}
</style>
html
<!-- App.vue -->
<template>
  <teleport to="#modal">
    <Modal />
  </teleport>
</template>
<script>
import Modal from "./components/Modal.vue";
export default {
  components: { Modal },
  name: "App",
};
</script>
html
<!-- index.html -->
<div id="modal"></div>
19. Suspense 组件
目标:掌握 Suspense 组件的使用方式
- [ ] 说明 suspense 组件的作用及使用场景
- [ ] 通过代码验证 suspense 组件的使用方式
当组件中的 setup 被写成异步函数的形式, 代码执行的顺序就变成了先渲染模板后执行 setup 函数了。
Suspense 用于确保组件中的 setup 函数调用和模板渲染之间的执行顺序。先执行 setup 后渲染模板。
vue
<!-- Posts.vue -->
<template>
  <pre>{{ data }}</pre>
</template>
<script>
import axios from "axios";

export default {
  name: "Posts",
  async setup() {
    let response = await axios.get(
      "https://jsonplaceholder.typicode.com/posts"
    );
    return { data: response.data };
  },
};
</script>
vue
<!-- App.vue -->
<template>
  <Suspense>
    <Posts />
  </Suspense>
</template>
<script>
import Posts from "./components/Posts.vue";
export default {
  components: { Posts },
  name: "App",
};
</script>
通过 suspense 组件还可以为异步操作添加等待提示效果。
html
<!-- App.vue -->
<template>
  <Suspense>
    <template v-slot:default>
      <Posts />
    </template>
    <template v-slot:fallback> loading... </template>
  </Suspense>
</template>
<script>
import Posts from "./components/Posts.vue";
export default {
  components: { Posts },
  name: "App",
};
</script>
20. 过渡动画
目标:掌握 transition 组件的使用方式
20.1 概述
Vue 提供了 transition 组件供我们执行过渡动画, 我们只需要使用 transition 组件包裹你要执行动画的元素即可。
执行过渡动画的前提条件是元素具有创建与销毁的操作。
vue
<transition>
  <h1>hello world</h1>
</transition>
当创建元素时, transiton 组件会为执行动画的元素添加三个类名, 我们可以通过这三个类名为元素添加入场动画。
css
.v-enter-from {}    // 元素执行动画的初始样式 (动画起点样式)
.v-enter-to {}      // 元素执行动画的目标样式 (动画终点样式)
.v-enter-active {}  // 可以用于指定元素指定动画的类型
css
.v-enter-from { opacity: 0 }
.v-enter-to { opacity: 1 }
.v-enter-active { transition: opacity 2s ease-in } // ease-in 先慢后快
当销毁元素时, transition 组件会为执行动画的元素添加三个类名, 我们可以通过这个三个类名为元素添加离场动画样式。
css
.v-leave-from {}      // 元素执行动画的初始样式 (动画起点样式)
.v-leave-to {}        // 元素执行动画的目标样式 (动画终点样式)
.v-leave-active {}    // 可以用于指定元素指定动画的类型
css
.v-leave-from { opacity: 1 }
.v-leave-to { opacity: 0 }
.v-leave-active { transition: opacity 2s ease-out } // ease-out 先快后慢
如果在页面中有多个元素要执行动画, 而多个元素要执行的动画不同时, 为了对多个元素的动画样式进行区分, 在调用 transiton 组件时需要为它添加 name 属性以区分样式类名。
vue
<transition name="fade">
  <h1>hello world</h1>
</transition>
css
.fade-enter-from {}
.fade-enter-to {}
.fade-enter-active{}

.fade-leave-from {}
.fade-leave-to {}
.fade-leave-active {}
20.2 示例
需求: 点击按钮让元素显示隐藏 (执行动画)
vue
<transition name="fade">
  <h2 v-if="show">hello world</h2>
</transition>
<button @click="show = !show">button</button>
javascript
const show = ref(false);css
.fade-enter-from {
  opacity: 0;
}
.fade-enter-to {
  opacity: 1;
}
.fade-enter-active {
  transition: opacity 2s ease-in;
}

.fade-leave-from {
  opacity: 1;
}
.fade-leave-to {
  opacity: 0;
}
.fade-leave-active {
  transition: opacity 2s ease-out;
}
21. 状态管理 Vuex
掌握 Vuex 实现全局状态管理的方式
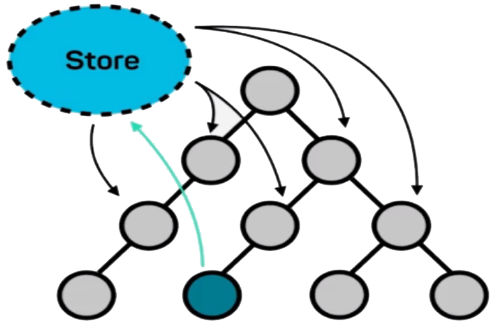
21.1 问题
在不使用全局状态管理库时,应用状态由组件管理,当多个组件需要共同使用同一个应用状态时,应用状态需要通过 props 和自定义事件在组件之间进行传递,在组件与组件之间的关系比较疏远时,手递手的这种传递方式显得特别混乱,使得应用的维护变得困难。
 .
.
在使用了全局状态管理库后,应用状态被单独存储在一个独立于组件的 Store 对象中,所有组件可以直接从这个对象中获取状态,省去了繁琐的组件状态传递过程。
 .
.
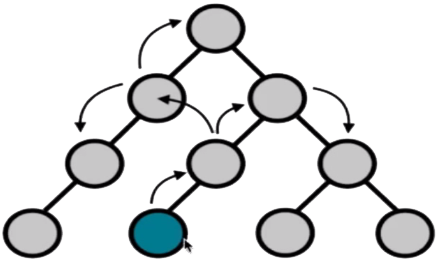
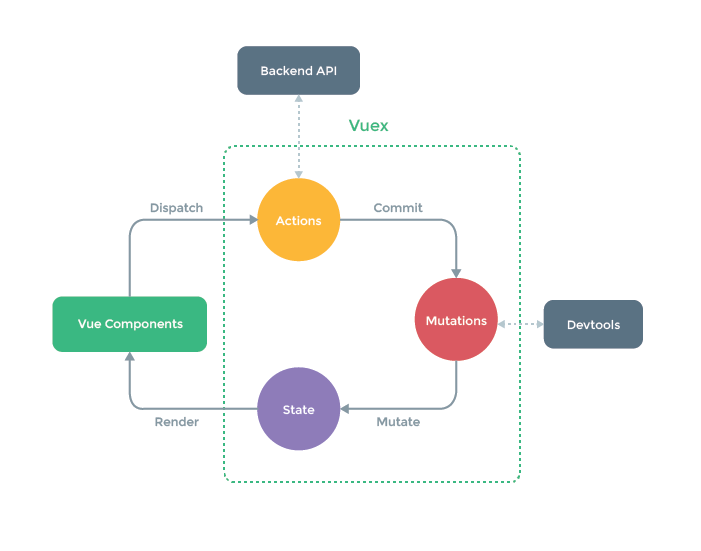
21.2 Vuex 工作流程
State: 用于存储应用状态 (store.state)
Action: 用于执行异步操作,不能在此处直接修改状态 (dispatch)
Mutation: 用于执行同步操作,修改 state 中的存储的应用状态 (commit)
Getter: vuex 中的计算属性 (store.getters)
Module: 模块,用于对状态进行文件拆分
在组件中开发者可以通过 dispatch 调用 Action 类型的方法执行异步操作,当异步操作执行完成后,在 Action 方法中可以通过 commit 调用 mutation 类型的方法修改状态,当状态被修改以后,视图更新。
 .
.
21.3 下载
Vuex 目前有两个版本,一个是 3.6.2,另一个是 4.0.2,3.x 的版本是供 Vue2 使用的,4.x 版本是供 Vue3 使用的。
bash
npm install vuex@4.0.221.4 创建 Store
javascript
// src/store/index.js
import { createStore } from 'vuex'
export default createStore({})
javascript
// src/main.js
import store from './store'
const app = createApp(App)
app.use(store)
21.5 state
在应用状态对象中存储 username 状态.
javascript
export default createStore({
  state: {
    username: '张三'
  }
})
在组件中获取 username 状态
html
<template>
  {{$store.state.username}}
</template>
vue
<script>
import { useStore } from 'vuex'
export default {
  setup () {
    const store = useStore()
    console.log(store.state.username)
  }
}
</script>
21.6 getters
getters 是 vuex 中的计算属性,基于现有状态计算出新的状态。
javascript
export default createStore({
  getters: {
    newUsername (state) {
      return state.username + '😀😀😀😀'
    }
  }
})
vue
<template>
  {{$store.getters.newUsername}}
</template>
vue
<script>
export default {
  setup () {
    console.log(store.getters.newUsername)
  }
}
</script>
21.7 mutations
mutations 是 vuex 中用于修改状态的方法。
javascript
export default createStore({
  mutations: {
    updateUsername (state, username) {
      state.username = username
    }
  }
})
html
<template>
  <button @click="$store.commit('updateUsername', '李四')">
    change username
  </button>
</template>
21.8 actions
actions 在 Vuex 中用于执行异步操作, 当异步操作执行完成以后可以通过 commit 调用 mutation 方法来修改应用状态
javascript
export default createStore({
  actions: {
    updateName (ctx) {
      setTimeout(() => {
        ctx.commit('updateName', '李四')
      }, 1000)
    }
  }
})
html
<template>
  <button @click="onClickHandler">button</button>
</template>
<script>
export default {
  setup () {
    const onClickHandler = () => {
      store.dispatch('updateName')
    }
    return { onClickHandler }
  }
}
</script>
21.9 module
Vuex 允许开发者通过模块对状态进行拆分,允许开发者将不同功能的状态代码拆分到不同的模块文件中。
命名空间模块需要在模块对象中添加 namespaced: true 选项。
javascript
import { createStore } from 'vuex'

const moduleA = {
  namespaced: true,
  state () {
    return { name: '模块A' }
  }
}
const moduleB = {
  namespaced: true,
  state () {
    return { name: '模块B' }
  }
}

export default createStore({
  modules: {
    a: moduleA,
    b: moduleB
  }
})
html
<template>
  {{$store.state['a'].name}}
  {{$store.state['b'].name}}
</template>
javascript
import { createStore } from 'vuex'

const moduleA = {
  namespaced: true,
  getters: {
    newName (state) {
      return state.name + '😀'
    }
  }
}
const moduleB = {
  namespaced: true,
  getters: {
    newName (state) {
      return state.name + '😀'
    }
  }
}

export default createStore({
  modules: {
    a: moduleA,
    b: moduleB
  }
})
html
<template>
  {{$store.getters['a/newName']}}
  {{$store.getters['b/newName']}}
</template>
javascript
import { createStore } from 'vuex'

const moduleA = {
  namespaced: true,
  mutations: {
    updateName (state) {
      state.name = '我是模块A'
    }
  }
}
const moduleB = {
  namespaced: true,
  mutations: {
    updateName (state) {
      state.name = '我是模块B'
    }
  }
}

export default createStore({
  modules: {
    a: moduleA,
    b: moduleB
  }
})
vue
<template>
  {{$store.getters['a/newName']}}
  {{$store.getters['b/newName']}}
  <button @click="$store.commit('a/updateName')">update moduleA</button>
  <button @click="$store.commit('b/updateName')">update moduleb</button>
</template>
22. 双向数据绑定
目标: 掌握实现组件双向数据绑定的方式
- [ ] 回顾表单元素的双向数据绑定
- [ ] 实现组件的双向数据绑定
22.1 实现表单双向数据绑定
1. 什么是双向数据绑定?
双向指的是数据和视图,双向数据绑定是指数据和视图进行绑定,数据变化同步视图,视图更改了数据,将更改同步回数据。
2. 如何实现双向数据绑定?
vue
<template>
  <input type="text" v-model="firstName" />
  <button @click="onClickHandler">button</button>
</template>
<script>
import { ref } from "vue";
export default {
  setup() {
    const firstName = ref("张三");
    const onClickHandler = () => {
      firstName.value = "李四";
    };
    return { firstName, onClickHandler };
  },
};
</script>
3. 如何监听双向数据绑定中数据的变化
vue
<template>
  <input
    type="text"
    v-model="firstName"
    @update:modelValue="onFirstNameChanged($event)"
  />
</template>
<script>
import { ref } from "vue";
export default {
  setup() {
    const firstName = ref("张三");
    const onFirstNameChanged = (event) => {
      console.log(event);
    };
    return { firstName, onFirstNameChanged };
  },
};
</script>
22.2 实现组件双向数据绑定
1. 普通版
App.vue
vue
<template>
  <Test
    :firstName="firstName"
    @onFirstNameChanged="onFirstNameChanged($event)"
  />
  <button @click="onClickHandler">我是App组件中的 button</button>
</template>
<script>
import Test from "./components/Test.vue";
import { ref } from "vue";
export default {
  components: { Test },
  name: "App",
  setup() {
    const firstName = ref("张三");
    const onClickHandler = () => {
      firstName.value = "李四";
    };
    const onFirstNameChanged = (event) => {
      firstName.value = event;
    };
    return { firstName, onClickHandler, onFirstNameChanged };
  },
};
</script>
Test.vue
vue
<template>
  <div>
    {{ firstName }}
    <button @click="onClickHandler">我是Test组件中的button</button>
  </div>
</template>
<script>
export default {
  props: ["firstName"],
  setup(props, { emit }) {
    const onClickHandler = () => {
      emit("onFirstNameChanged", "王五");
    };
    return { onClickHandler };
  },
};
</script>
2. 升级版
App.vue
vue
<template>
  <Test v-model="firstName" />
  <button @click="onClickHandler">我是App组件中的 button</button>
</template>
<script>
import Test from "./components/Test.vue";
import { ref } from "vue";
export default {
  components: { Test },
  name: "App",
  setup() {
    const firstName = ref("张三");
    const onClickHandler = () => {
      firstName.value = "李四";
    };
    return { firstName, onClickHandler };
  },
};
</script>
Test.vue
vue
<template>
  <div>
    {{ modelValue }}
    <button @click="onClickHandler">我是Test组件中的button</button>
  </div>
</template>
<script>
export default {
  props: ["modelValue"],
  setup(props, { emit }) {
    const onClickHandler = () => {
      emit("update:modelValue", "王五");
    };
    return { onClickHandler };
  },
};
</script>
3. 终极版
App.vue
vue
<template>
  <Test v-model:firstName="firstName" v-model:lastName="lastName" />
  <button @click="onClickHandler">我是App组件中的 button</button>
</template>
<script>
import Test from "./components/Test.vue";
import { ref } from "vue";
export default {
  components: { Test },
  name: "App",
  setup() {
    const firstName = ref("张三");
    const lastName = ref("李四");
    const onClickHandler = () => {
      firstName.value = "孙悟空";
      lastName.value = "猪八戒";
    };
    return { firstName, lastName, onClickHandler };
  },
};
</script>
Test.vue
react
<template>
  <div>
    {{ firstName }} {{ lastName }}
    <button @click="onClickHandler">我是Test组件中的button</button>
  </div>
</template>
<script>
export default {
  props: ["firstName", "lastName"],
  setup(props, { emit }) {
    const onClickHandler = () => {
      emit("update:firstName", "刘备");
      emit("update:lastName", "诸葛亮");
    };
    return { onClickHandler };
  },
};
</script>
23. customRef
23.1 复习防抖
防抖:监听用户的连续操作,最终只响应连续操作中的最后一次。
vue
<template>
  <button @click="onClickHandler">button</button>
</template>
<script>
export default {
  name: "App",
  setup() {
    const onClickHandler = debounce(() => {
      console.log("onClickHandler");
    }, 400);
    return { onClickHandler };
  },
};
function debounce(handler, delay) {
  let timer = null;
  return function () {
    clearTimeout(timer);
    timer = setTimeout(() => {
      handler.call(this, arguments);
    }, delay);
  };
}
</script>
23.2 customRef
创建具有自定义行为的响应式数据,通过拦截响应式数据的读取和设置实现。
需求: 创建具有防抖功能的响应式数据,监听对响应式数据的连续更改,只响应最后一次更改。
vue
<template>
  <input type="text" v-model="keyword" />
  {{ keyword }}
</template>
<script>
import { customRef } from "vue";
export default {
  name: "App",
  setup() {
    const keyword = useDebounceRef("Hello", 400);
    return { keyword };
  },
};

function useDebounceRef(initialValue, delay) {
  let timer = null;
  return customRef((track, trigger) => {
    return {
      get() {
        // 跟踪 initialValue 值的变量
        track();
        return initialValue;
      },
      set(newValue) {
        clearTimeout(timer);
        timer = setTimeout(() => {
          initialValue = newValue;
          // 触发视图更新
          trigger();
        }, delay);
      },
    };
  });
}
</script>
24. setup 语法糖
<script setup></script> 是一种编译时语法糖,用于在单文件组件中使用组合式API,如果你同时使用单文件组件和组合式API,建议使用该语法。
它与普通语法相比,代码更加简洁、更好的 TS 支持。
vue
<script setup>
// 此处代码将会被编译为 setup 函数代码
// 也就是说此处代码将会在组件挂载时执行
// 在内部声明的顶级变量和函数都可以在模板中你直接使用
const msg = "Hello Vue3 setup";

function log() {
  console.log(msg);
}
</script>

<template>
  <div @click="log">{{ msg }}</div>
</template>
vue
<script setup>
// 在此处可以直接导入外部的辅助方法在模板直接使用
import { capitalize } from "./helps";

const msg = "Hello Vue3 setup";
</script>

<template>
  {{ capitalize(msg) }}
</template>
vue
<script setup>
import { ref } from "vue";

const count = ref(0);
</script>

<template>
  <div @click="count++">{{ count }}</div>
</template>
vue
<script setup>
// 在此处可以直接导入组件在模板中使用, 不再需要手动注册组件
import HelloWorld from "@/components/HelloWorld";
</script>

<template>
  <HelloWorld />
</template>
vue
<!-- src/App.vue -->
<script setup>
import HelloWorld from "./components/HelloWorld";
</script>

<template>
  <HelloWorld msg="Hello Vue script setup" />
</template>
vue
<!-- src/components/HelloWorld.vue -->
<script setup>
// 定义该组件接收的 Props
// defineProps 在此处可以直接使用无需导入
defineProps({ msg: String });
</script>
<template>
  {{ msg }}
</template>
vue
<!-- src/components/HelloWorld.vue -->
<script setup>
// defineEmits 在此处可以直接使用无需导入
defineEmits(["delete"]);
</script>
<template>
  <button @click="$emit('delete')">delete button</button>
</template>
vue
<!-- src/App.vue -->
<script setup>
import HelloWorld from "./components/HelloWorld";
function onDeleteHandler() {
  alert("deleted");
}
</script>

<template>
  <HelloWorld @delete="onDeleteHandler" />
</template>
vue
<!-- src/components/HelloWorld.vue -->
<script setup>
const count = 0;
// 定义当前组件向外暴露的数据
defineExpose({ count });
</script>
vue
<!-- src/App.vue -->
<script setup>
import HelloWorld from "./components/HelloWorld";
import { ref } from "vue";
const instance = ref(null);
function log() {
  console.log(instance.value.count);
}
</script>

<template>
  <HelloWorld ref="instance" />
  <button @click="log">button</button>
</template>
vue
<!-- src/components/HelloWorld.vue -->
<script setup>
import { useSlots, getCurrentInstance } from "vue";
// 获取组件实例
const currentInstance = getCurrentInstance();
// 获取插槽
const slots = useSlots();
// 通过 JSX 渲染模板
currentInstance.render = () => <div>{slots.default()}</div>;
</script>
vue
<!-- src/App.vue -->
<script setup>
import HelloWorld from "./components/HelloWorld";
</script>

<template>
  <HelloWorld>
    <h1>Hello World</h1>
  </HelloWorld>
</template>
vue
<!-- src/App.vue -->
<script setup>
const post = await fetch(`/api/post/1`).then((r) => r.json())
</script>
25 状态管理 Pinia
25.1 pinia 概述
Vue3 专属状态管理工具。
bash
cd pinia-tutorial && npm install
npm install pinia@2.0.14
npm run dev
javascript
// src/main.js
import { createPinia } from 'pinia'
// return the root store
app.use(createPinia())
25.2 创建 ProductStore
pinia 中的 store 是模块化的,根据不同的状态划分不同的模块,比如产品列表状态模块、购物车状态模块。
目标:创建 ProductStore 用于存储商品列表状态。
javascript
// src/stores/ProductStore.js
import { defineStore } from "pinia";
import products from "@/data/products.json";

// ProductStore: store id, 在浏览器的调试工具中使用, 它可以是任何值, 但是必须是唯一的, 建议设置成文件名称
export const useProductStore = defineStore("ProductStore", {
  state: () => {
    return {
      products: products,
      test: "test"
    };
  },
});
vue
<!-- src/App.vue -->
<script setup>
import { useProductStore } from "./stores/ProductStore";
useProductStore();
</script>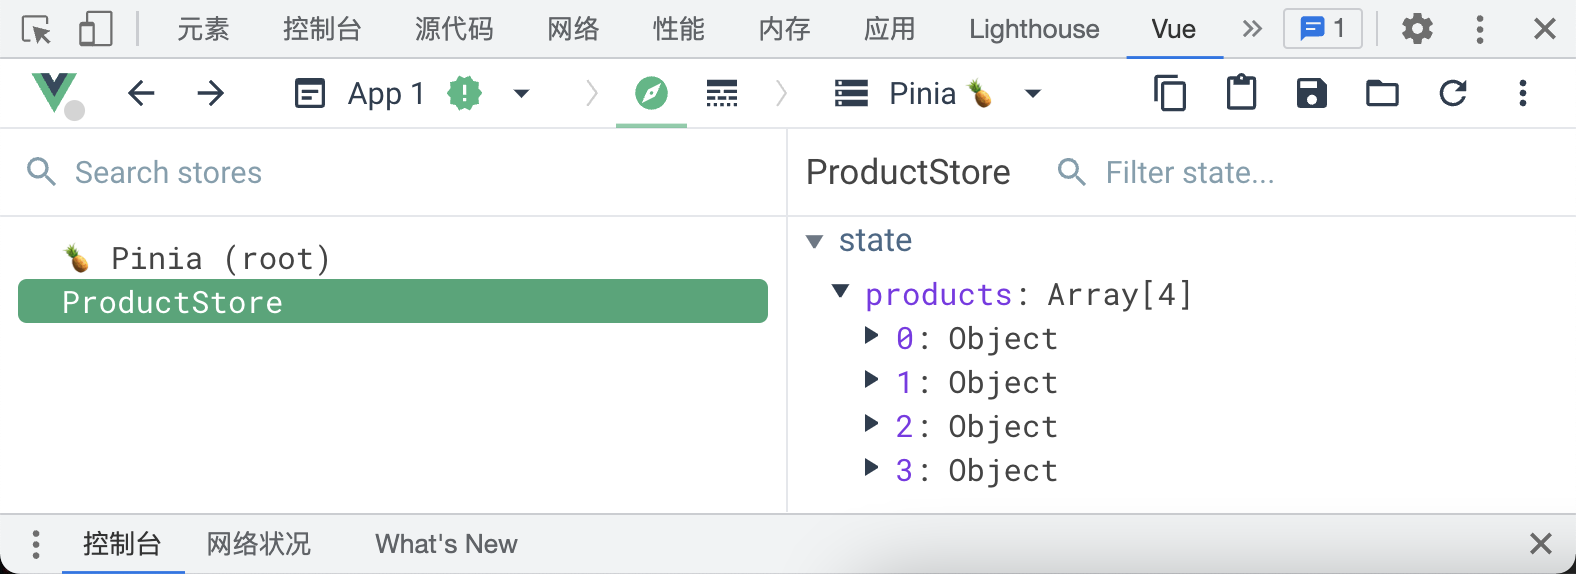 .
.
25.3 组件获取状态
vue
<!-- src/App.vue -->
<script setup>
import { useProductStore } from "./stores/ProductStore";
const productStore = useProductStore();
</script>

<template>
  <ProductCard v-for="product in productStore.products" :key="product.name" :product="product" />
</template>
vue
<!-- src/App.vue -->
<script setup>
import { useProductStore } from "./stores/ProductStore";
import { storeToRefs } from "pinia";

// 注意: 不能直接从 store 对象中进行成员解构, 这将失去数据响应式(基本数据类型)
// 错误写法 👇🏻
// const { test } = useProductStore();
// 正确写法 👇🏻
const { products, test } = storeToRefs(useProductStore());
</script>

<template>
  <ProductCard v-for="product in products" :key="product.name" :product="product" />
</template>
25.4 action 方法
在 pinia 中,store 中的 action 方法可以执行异步操作,也可以修改状态。
javascript
// src/stores/ProductStore.js
import { defineStore } from "pinia";
import products from "@/data/products.json";

export const useProductStore = defineStore("ProductStore", {
  state: () => {
    return {
      products: [],
    };
  },
  actions: {
    fill() {
      // this: 当前 store 的实例对象
      this.products = products;
    },
  },
});
vue
<!-- src/App.vue -->
<script setup>
const productStore = useProductStore();
productStore.fill();
</script>
javascript
// src/stores/ProductStore.js
import { defineStore } from "pinia";

export const useProductStore = defineStore("ProductStore", {
  state: () => {
    return {
      products: [],
    };
  },
  actions: {
    async fill() {
      this.products = (await import("@/data/products.json")).default;
    },
  },
});
25.5 将商品加入购物车
第一步:创建用于存储购物车商品列表状态的 store 对象。
javascript
// src/stores/CartStore.js
import { defineStore } from "pinia";

export const useCartStore = defineStore("CartStore", {
  state: () => {
    return {
      items: [],
    };
  },
});
第二步:将商品加入购物车 (第一种方案)
vue
<!-- src/App.vue -->
<script setup>
import { useCartStore } from "@/stores/CartStore";
const cartStore = useCartStore();
</script>

<template>
  <ProductCard @addToCart="cartStore.items.push(product)"/>
</template>
第二步:将商品加入购物车 (第二种方案)
vue
<!-- src/App.vue -->
<script setup>
import { useCartStore } from "@/stores/CartStore";
const cartStore = useCartStore();

function addToCart(count, product) {
  for (let i = 0; i < count; i++) {
    cartStore.items.push(product);
  }
}
</script>

<template>
  <ProductCard @addToCart="addToCart($event, product)" />
</template>
第二步:将商品加入购物车 (第三种方案)
vue
<!-- src/App.vue -->
<script setup>
import { useCartStore } from "@/stores/CartStore";
const cartStore = useCartStore();

function addToCart(count, product) {
  for (let i = 0; i < count; i++) {
    cartStore.$patch((state) => {
      state.items.push({...product});
    });
  }
}
</script>

<template>
  <ProductCard @addToCart="addToCart($event, product)" />
</template>
第二步:将商品加入购物车 (第四种方案)
javascript
// src/stores/CartStore.js
export const useCartStore = defineStore("CartStore", {
  actions: {
    addItems(count, product) {
      for (let i = 0; i < count; i++) {
        this.items.push(product);
      }
    },
  },
});
vue
<!-- src/App.vue -->
<script setup>
import { useCartStore } from "@/stores/CartStore";
const cartStore = useCartStore();
</script>

<template>
  <ProductCard @addToCart="cartStore.addItems($event, product)"/>
</template>
25.6 计算购物车商品数量
计算购物车中的商品数量属于基于现有状态派生新的状态,此类操作在 pinia 中应使用 getters 属性。
javascript
// src/stores/CartStore.js
import { defineStore } from "pinia";

export const useCartStore = defineStore("CartStore", {
  getters: {
    count() {
      return this.items.length;
    },
  },
});
vue
<!-- src/components/CartWidget.vue -->
<script setup>
import { useCartStore } from "../stores/CartStore";
const cartStore = useCartStore();
</script>

<template>
	<div class="cart-count absolute">{{ cartStore.count }}</div>
</template>
如果购物车中有商品,显示商品列表,否则显示购物车中没有商品的提示。
javascript
// src/stores/CartStore.js
import { defineStore } from "pinia";

export const useCartStore = defineStore("CartStore", {
  getters: {
    isEmpty() {
      return this.items.length === 0;
    },
  },
});
vue
<!-- src/components/CartWidget.vue -->
<script setup>
import { useCartStore } from "../stores/CartStore";
const cartStore = useCartStore();
</script>
<template>
  <div v-if="!cartStore.isEmpty"></div>
  <div v-else><em>Cart is Empty</em></div>
</template>
在 getters 方法中如果使用箭头函数,则函数内部的 this 指向 undefined,此时可以通过 state 参数获取状态,改写如下。
javascript
// src/stores/CartStore.js
import { defineStore } from "pinia";

export const useCartStore = defineStore("CartStore", {
  getters: {
    count: (state) => state.items.length,
    isEmpty: (state) => state.items.length === 0,
  },
});
25.7 渲染购物车列表
目前代码中存在的问题是在购物车列表中有很多重复的商品,而要展示的购物车列表中不能将同一件商品展示多次。
解决问题的方式是按照商品名称对商品进行分组,最终得到一个对象,对象的属性是商品名称,对象的值是一个数组,在渲染购物车列表时,遍历该对象即可,对象属性值的长度就是该商品在购物车中的数量。
javascript
// src/stores/CartStore.js
import { groupBy } from "lodash";
import { defineStore } from "pinia";

export const useCartStore = defineStore("CartStore", {
  getters: {
    grouped: (state) => groupBy(state.items, (item) => item.name),
  },
});
vue
<!-- src/components/CartWidget.vue -->
<template>
  <CartItem v-for="(items, name) in cartStore.grouped" :key="name" :product="items[0]" :count="items.length"/>
</template>
在 pinia 中调用 getter 方法时可以传递参数,购物车中的每件商品的数量的获取就可以通过这个知识点实现。
javascript
// src/stores/CartStore.js
export const useCartStore = defineStore("CartStore", {
  getters: {
    grouped: (state) => groupBy(state.items, (item) => item.name),
    groupedCount: (state) => (name) => state.grouped[name].length,
  },
});
vue
<!-- src/components/CartWidget.vue -->
<template>
  <CartItem :count="cartStore.groupedCount(name)"/>
</template>
25.8 清空购物车
vue
<!-- src/components/CartWidget.vue -->
<template>
	<AppButton @click="cartStore.$reset()" >Clear Cart</AppButton>
</template>
25.9 计算商品总价
javascript
// src/stores/CartStore.js
export const useCartStore = defineStore("CartStore", {
  getters: {
    totalPrice: (state) => state.items.reduce((price, item) => (price += item.price), 0)
  },
});
vue
<!-- src/components/CartWidget.vue -->
<template>
	Total: <strong>${{ cartStore.totalPrice }}</strong>
</template>
25.10 删除商品
javascript
// src/stores/CartStore.js
export const useCartStore = defineStore("CartStore", {
  actions: {
    clearItem(name) {
      this.items = this.items.filter((item) => item.name !== name);
    },
  },
});
vue
<!-- src/components/CartWidget.vue -->
<template>
	<CartItem @clear="cartStore.clearItem(name)"/>
</template>
25.11 更新商品数量
vue
<!-- src/components/AppCountInput.vue -->
<template>
  <input @input="updateValue($event.target.value)"/>
</template>
vue
<!-- src/components/CartWidget.vue -->
<template>
	<CartItem @updateCount="cartStore.setItemCount(items[0], $event)"/>
</template>
javascript
// src/stores/CartStore.js
export const useCartStore = defineStore("CartStore", {
  actions: {
    // 设置商品数量
    setItemCount(item, count) {
      // 先将商品删除
      this.clearItem(item.name);
      // 再重新添加商品
      this.addItems(count, item);
    },
  },
  getters: {
    grouped: (state) => {
      const grouped = groupBy(state.items, (item) => item.name);
      // 排序的目的是在增加或减少数量时放置列表中的数据变换位置
      const sorted = Object.keys(grouped).sort();
      let inOrder = {};
      sorted.forEach((key) => {
        inOrder[key] = grouped[key];
      });
      return inOrder;
    }
  },
});
25.12 访问其他 store
目标:在 store 中访问其他 store 中的状态。
javascript
// src/stores/UserStore.js
import { defineStore } from "pinia";

export const useUserStore = defineStore("UserStore", {
  state: () => {
    return { username: "张三" };
  },
});
javascript
// src/stores/CartStore.js
import { useUserStore } from "./UserStore";

export const useCartStore = defineStore("CartStore", {
  actions: {
    checkout() {
      const userStore = useUserStore();
      alert(userStore.username);
    },
  },
});
vue
<!-- src/components/CartWidget.vue -->
<template>
	<AppButton @click="cartStore.checkout">Checkout</AppButton>
</template>
25.13 选项式 API 获取 state
vue
<!-- src/components/TheHeader.vue -->
<script>
import CartWidget from "./CartWidget.vue";
import { useUserStore } from "../stores/UserStore";
import { mapState, mapWritableState } from "pinia";

export default {
  components: {
    CartWidget,
  },
  computed: {
    // ...mapState(useUserStore, ["username"]),
    // ...mapState(useUserStore, { user: "username" }),
    // ...mapState(useUserStore, { user: (state) => `${state.username}` }),
    // 通过 mapState 获取到的状态在组件中都是只读的不能修改
    // 通过 mapWritableState 获取到的状态在组件中是可以修改的
    ...mapWritableState(useUserStore, { user: "username" }),
  },
};
</script>

<template>
  <div>
    <input v-model="user" type="text" />
    <span class="mr-5">{{ user }}</span>
    <CartWidget class="inline-block" />
  </div>
</template>
25.14 选项式 API 获取 getter
javascript
// src/stores/UserStore.js
export const useUserStore = defineStore("UserStore", {
  getters: {
    username() {
      return "李四";
    },
  },
});
vue
<!-- src/components/TheHeader.vue -->
<script>
import { mapState } from "pinia";

export default {
  computed: {
    // getters 都是只读的, 在组件中不能修改
    ...mapState(useUserStore, ["username"]),
  },
};
</script>

<template>
  <span class="mr-5">{{ username }}</span>
</template>
25.15 选项式 API 获取 action
javascript
// src/stores/UserStore.js
import { defineStore } from "pinia";

export const useUserStore = defineStore("UserStore", {
  actions: {
    getProfile() {
      alert("getProfile");
    },
  },
});
vue
<!-- src/components/TheHeader.vue -->
<script>
import { mapActions } from "pinia";

export default {
  methods: {
    ...mapActions(useUserStore, ["getProfile"]),
  },
};
</script>

<template>
	<span @click="getProfile" class="mr-5">{{ username }}</span>
</template>
25.16 启动 store 热更新
默认情况下,pinia 中的 store 是不受热更新控制的,我们的目标就是让 store 支持热更新。
演示:注释 addItems 方法,刷新页面,执行加入购物车,程序报错,恢复 addItems 方法,执行加入购物车,程序依然报错。
javascript
import { acceptHMRUpdate } from "pinia";

if (import.meta.hot) {
  import.meta.hot.accept(acceptHMRUpdate(useCartStore, import.meta.hot));
}
25.17 监听 action
vue
// src/App.vue
<script>
  cartStore.$onAction(({ name, store, args, after, onError }) => {
    // name: 调用的 action 方法的名字
    // store: store 对象
    // args: 调用 action 时传递的参数
    // after: 当 action 方法执行完成后调用为 after 传递的回调函数
    // onError: 当 action 方法执行出错时调用为 onError 传递的回调函数
    if (name === "addItems") {
      after((result) => {
        console.log(args);
        // result: action 方法的返回值
        console.log(result);
      });
      onError((error) => {
        console.log(error.message);
      });
    }
  });
</script>
25.18 监听 state
vue
<!-- src/App.vue -->
<script setup>
// 订阅 cartStore 中的状态变化
cartStore.$subscribe((mutation, state) => {
  // mutation.type;     // "direct" | "patch object" | "patch function"
  // mutation.storeId   // "CartStore"
  // mutation.payload   // 传递给 $patch 方法的对象
  // state              // 状态对象
  localStorage.setItem(mutation.storeId, JSON.stringify(state));
});
// 当组件被卸载时, 订阅自动取消
</script>
javascript
// src/main.js
import { watch } from "vue";

const pinia = createPinia();

// 监听整个 store 中状态的变化
watch(
  pinia.state,
  (state) => {
    console.log(state);
  },
  {
    deep: true,
  }
);
26. 代理对象
目标: 了解代理对象的使用方式
什么是数据响应式?
数据驱动视图, 即数据和视图进行绑定, 当数据发生变化后, 视图自动更新.
如何实现数据响应式?
实现数据响应式的核心在于监听数据的变化, 当数据发生变化后, 执行视图更新操作.
Vue3 使用代理对象监听数据变化.
创建对象的代理对象, 从而实现对对象操作的拦截和自定义.
javascript
// person 对象, 源数据对象
const person = { name: "张三", age: 20 };
// p 对象, person 对象的代理对象
// 对 p 对象进行的所有操作都会映射到 person 对象
const p = new Proxy(person, {});
// 查询代码对象
console.log(p); // Proxy { name: "张三", age: 20 }
// 修改代理对象中的 name 属性
p.name = "李四";
// 输出源数据对象中的 name 属性
console.log(person.name); // 李四
// 删除代理对象中的 age 属性
delete p.age;
// 输出源数据对象中的 age 属性
console.log(person.age); // undefined
// 在代理对象中增加 sex 属性
p.sex = "男";
// 输出源数据对象中的 sex 属性
console.log(person.sex);
javascript
// person 对象, 源数据对象
const person = {
  name: "张三",
  age: 20,
  brand: { group: { title: "宝马" } },
};
// p 对象, person 对象的代理对象
// 对 p 对象进行的所有操作都会映射到 person 对象
const p = new Proxy(person, {
  get(target, property) {
    console.log("拦击到了获取操作");
    return target[property];
  },
  set(target, property, value) {
    console.log("拦截到了设置或者新增操作");
    target[property] = value;
  },
  deleteProperty(target, property) {
    console.log("拦截到了删除操作");
    return delete target[property];
  },
});
Vue 强制更新的应用场景:input 元素的 input 实时输入事件,默认只更新状态一次,若想实时更新必须使用 vue 的强制更新